Stock photography has been the default solution for years because it is affordable and convenient compared to running a photo shoot. But it is also imperfect.
We wanted to explore whether AI – in this case Nano Banana Pro in Gemini – could turn stock photos into images that feel custom made for your website. We walk through how we moved from an unusable stock image to a website hero shot in minutes, and share some tips on how AI imagery can sit alongside your branding and digital strategy.
The starting point
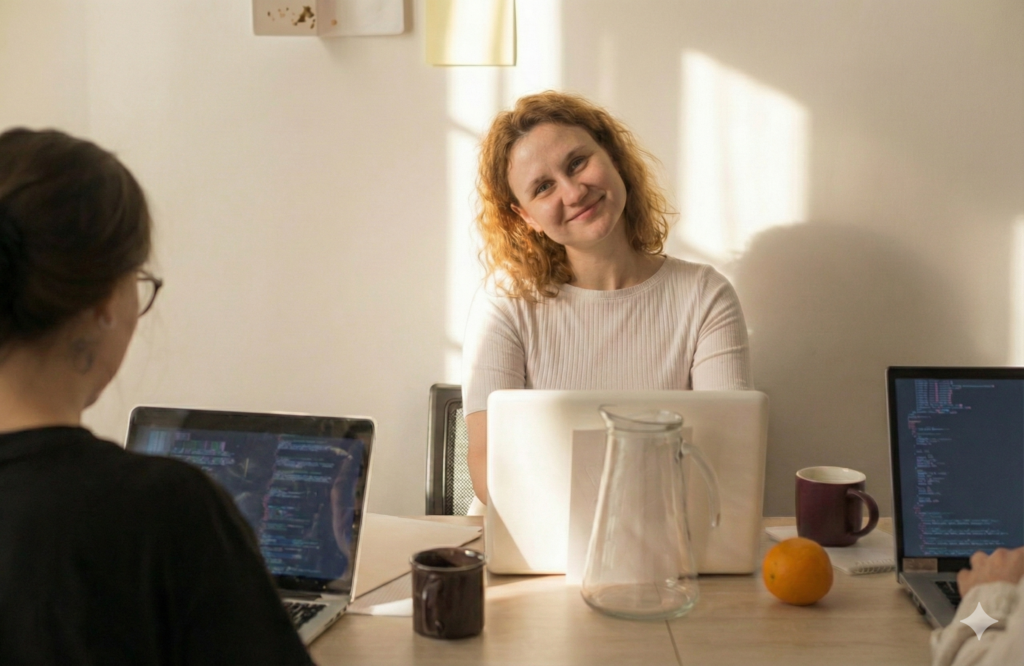
We chose a photo from the Unsplash+ stock library for this experiment. The image was versatile enough for different use cases, yet it also had several major issues:
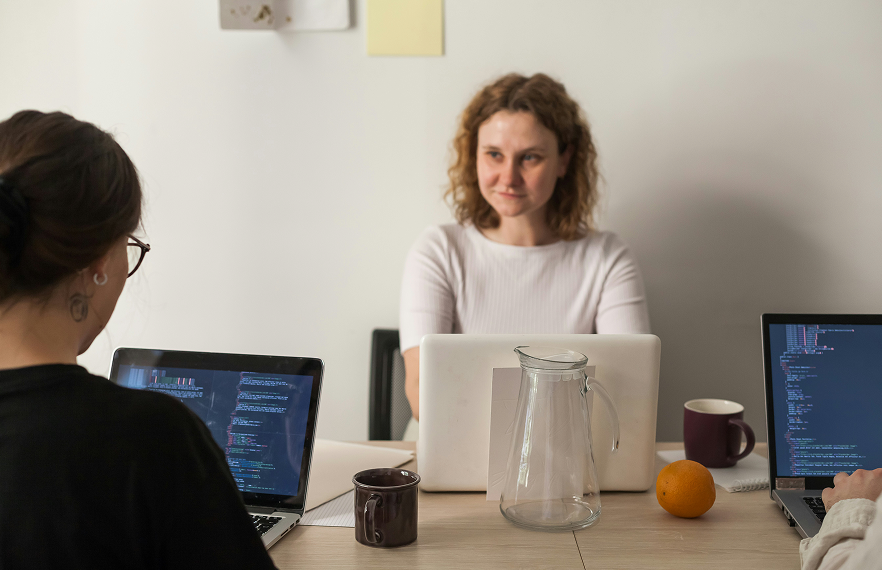
Original image sourced from Unsplash+
1. Focus was in the wrong place
The original image put its focus on the wrong subject. The foreground – specifically, the back of a woman in a black shirt – was sharp. The person we actually wanted viewers to notice, the woman whose face you can see, was slightly out of focus.
2. Framing felt imprecise
The scene lacked clear framing. Visual energy was leaking to the edges of the image where background figures, objects and space competed for attention.
3. Lighting was flat and dull
Finally, the lighting was serviceable but uninspiring. The overall tone felt washed out, with neither warmth nor intentional coolness.
On a typical project, this is the point where a team either keeps searching through stock libraries or compromises and uses the image as is. Instead, we treated the image as a starting point and ran a sequence of AI experiments to see how good we could make it.
Step-by-step: using Nano Banana Pro to transform the image
With a simple workflow using Nano Banana Pro and Adobe Photoshop, the same image can be transformed in minutes. AI handles the fast exploration of different looks, while Photoshop gives you the precision to refine details.
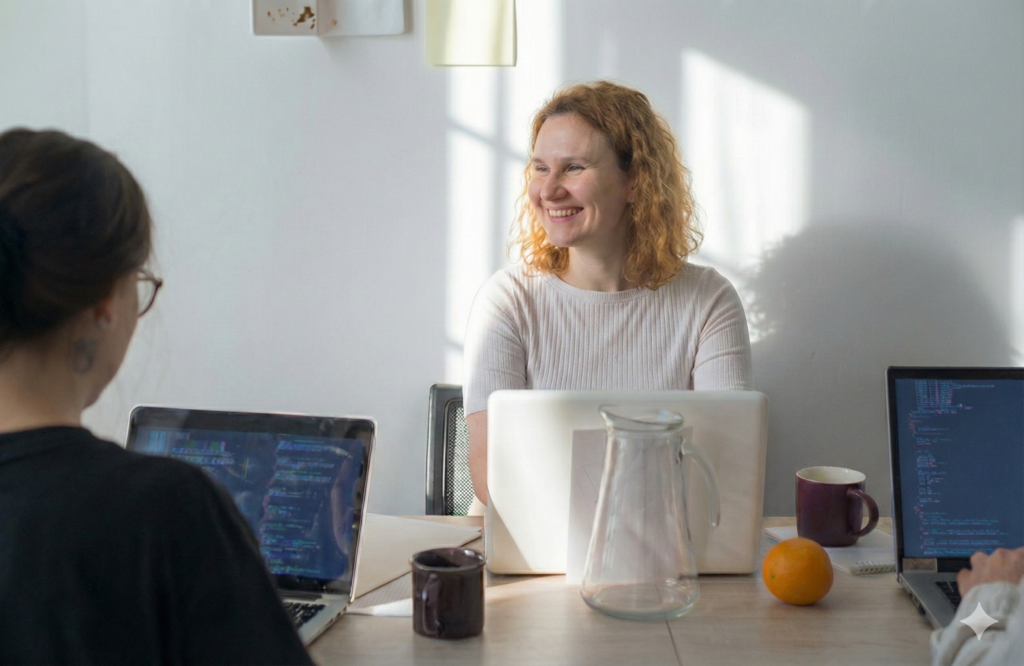
Step 1: Refocusing on the true subject
For our first prompt, we instructed the model to:
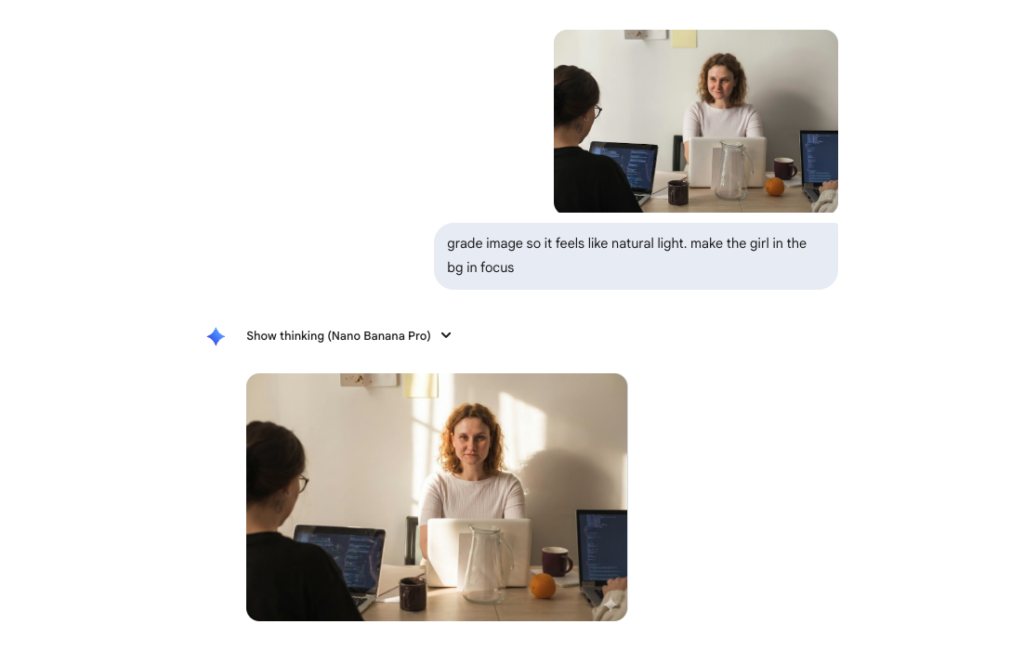
- Add more natural light.
- Shift the focus so that the main subject is the woman whose face you can see.
- Keep the overall composition and setting similar to the original.
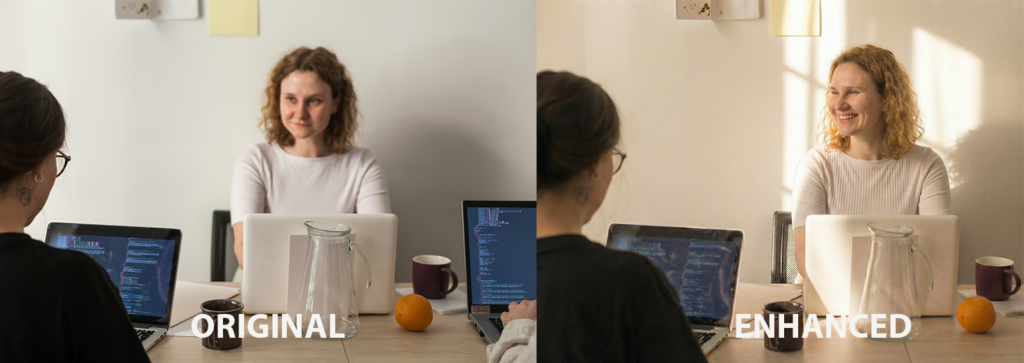
We wanted a version of the same moment that would work better as a website hero image: sharper focus on the subject and gentle softness where the viewer’s attention didn’t need to linger, with those areas falling slightly out of focus.
The first set of outputs already felt much closer to what we would use. However, the new version also introduced a problem of its own, with the subject now looking straight into the lens in a way that felt more intimidating than inviting.
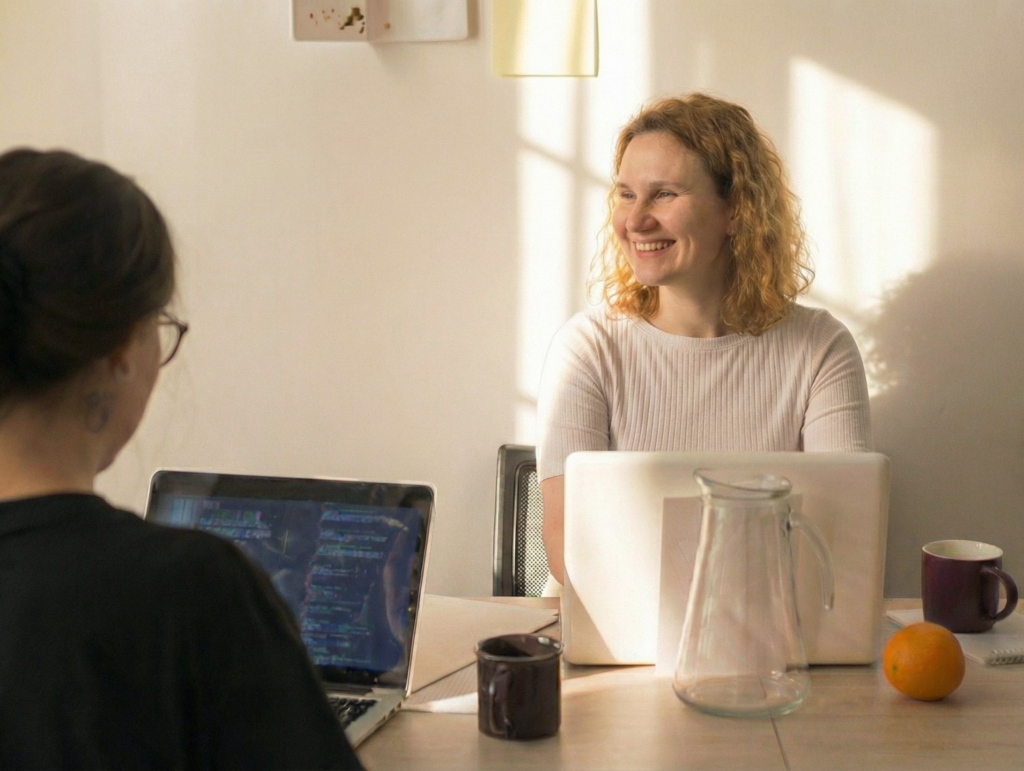
Step 2: Adjusting expression and body language
Once focus and lighting were moving in the right direction, we turned to expression.
So we guided the model more precisely, asking for:
- A softer gaze, not directly at the lens.
- A smile to introduce warmth.
- A head tilt to imply genuine engagement rather than a posed portrait.
In the next version, the subject came back with a smile and warmth that instantly lifted the image. But the model also interpreted our request for a head tilt literally, which we had to resolve with successive prompts.


Step 3: Experimenting with grading and tone
With composition and expression in a good place, we began experimenting with colour grading. We tried both warmer and cooler grades, adjusting contrast and saturation to see how the tone of the image changed in different contexts.
This is where AI tools really shine. Instead of sending a shot back to a photographer for regrading, or manually iterating through layers, we could explore multiple directions in minutes, then choose one or two treatments to refine further.
Step 4: Cropping to focus the story
The final step in our workflow was a simple crop and touch up in Photoshop. The original stock image contained a third person on the right whose presence made the scene feel more cluttered. By tightening the crop and adding a quick rebalance of curves, we:
- Brought the focus to the two key subjects.
- Removed visual distractions around the edges.
- Created a stronger sense that we’re witnessing a candid moment.
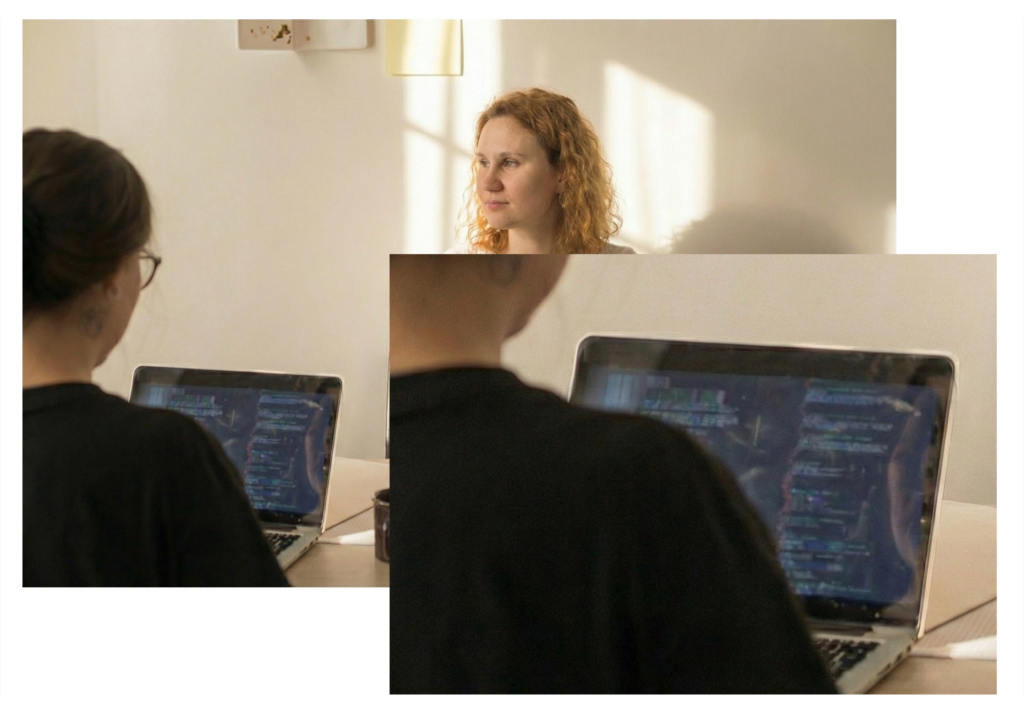
Dealing with hallucinations: keeping AI images grounded in reality
AI image generation has improved rapidly, but anyone who has used it frequently knows that hallucinations have not disappeared.
Across our experiments we noticed:
- Fine details around hands and faces could become slightly distorted or softened.
- Textured fabrics and background objects would sometimes blur into each other.
- When zoomed in, certain areas showed a kind of digital grain that felt like synthetic texture.
Our new workflow for imagery in website design
Here’s how we now handle visuals for our digital projects and website packages, using a hybrid mix of stock photography, AI editing and traditional editing:
- Start by selecting a stock photo with strong potential, checking that the licensing and terms of use allow for modification and commercial use.
- Use Nano Banana Pro in Gemini to generate new variations that correct imperfections and refine focus, light and composition.
- Bring those outputs into Adobe Photoshop alongside the original stock image.
- Blend the best parts of each – for example, the AI-improved lighting and expression with the original hands or background texture.
This allows us to keep the human characteristics and optical realism of the original image while still taking advantage of AI’s ability to reshape and iterate quickly.
Playing with aperture and lenses inside AI
Another advantage of AI is the ability to simulate different lens and aperture combinations without reshooting anything. In one experiment, we explored:
- A shallower depth of field at f/2.8 to bring the subject forward and melt everything else.
- A wide angle 20mm style lens to give more context to the environment.
- A tighter 105mm style lens for a more intimate, portrait-like frame.
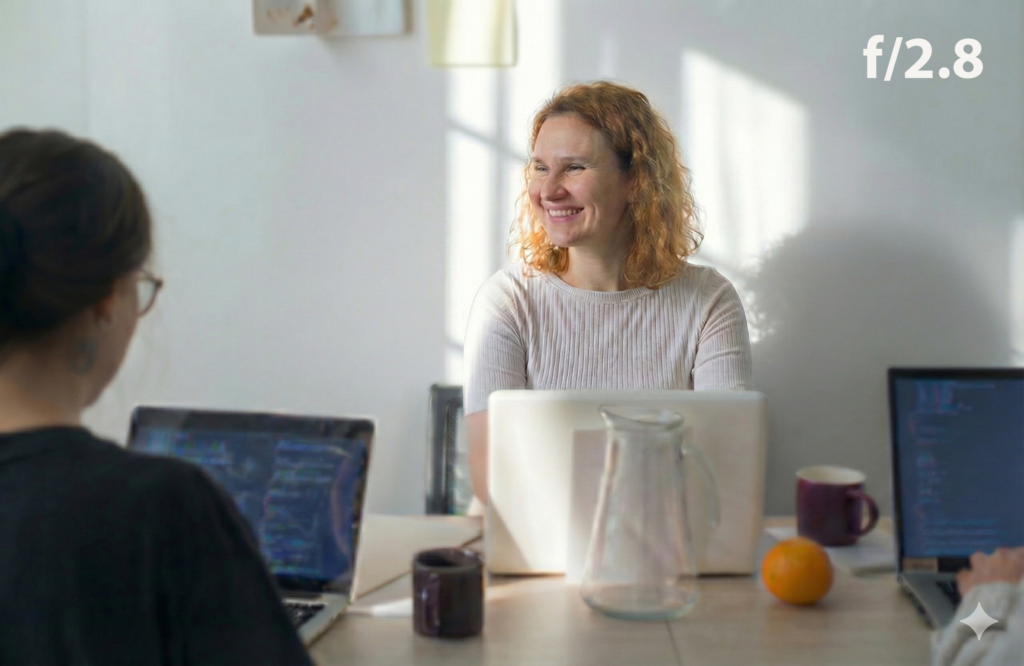
Generated at f/2.8 with a wide aperture for a shallow depth of field.
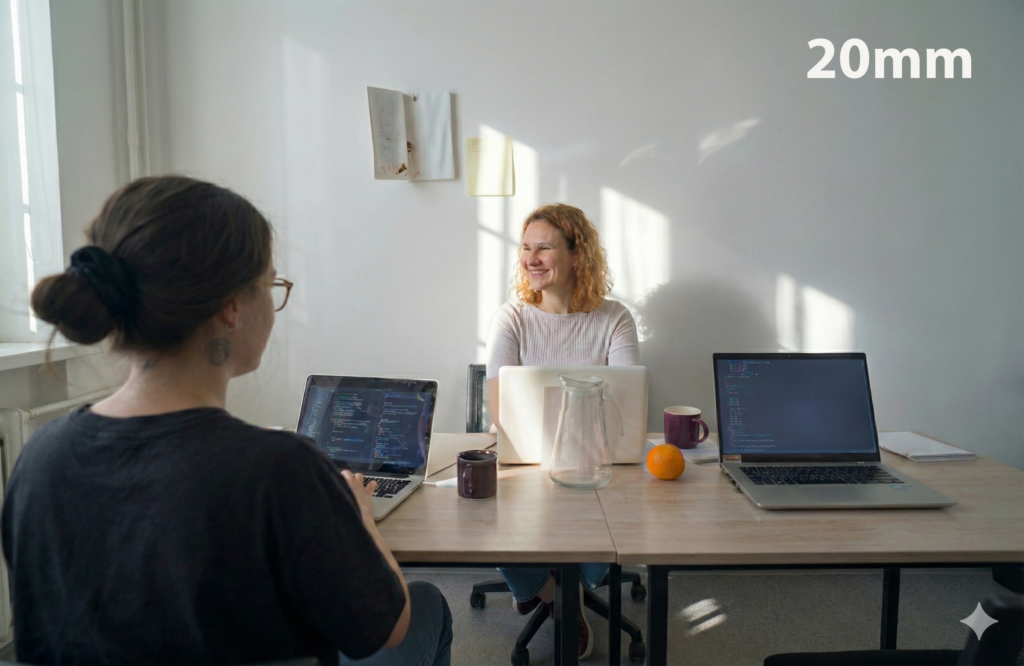
Generated at 20mm for a wide-angle perspective to bring more of the scene into frame.

Generated at 105mm to create a tighter perspective with gentle compression between the subject and background.
In practical terms, this means you can align your imagery with your message more precisely, while keeping incredible consistency from one iteration to the next.
What this means for NFPs, charities and SMEs
So what does all of this experimentation add up to if you are running a charity, NFP or small business that has to watch every dollar?
We know there are real ethical questions around AI and we take those seriously. At the same time, we also want to share practical, transparent ways you can use these tools to make limited budgets work harder.
1. Stock photography can be a great starting point
Instead of viewing stock photos as a finished product, think of it as raw footage. AI tools can now help you realign focus, adjust lighting, refine expressions and reframe the shot so it matches your brand story better.
2. Custom shoots still matter, but AI can extend their value
When you do invest in a full day or multi-day shoot, you want to squeeze as much value as possible from that work. AI can help here too by:
- Reframing near misses.
- Subtly tweaking lighting or grading.
- Adapting a shot for different crops and layouts without needing to reshoot.
3. Direction still matters more than technology
Perhaps the most important lesson from our experiments is that tools like Nano Banana do not replace the need for clear art direction. They respond to prompts, but they do not decide what story or creative you should tell.
In many ways it is like having a cinematographer without a director. The camera can move beautifully, the lenses can be perfect, but someone still has to decide what the scene is about. The same is true when you integrate AI imagery into your website: clarity of narrative, audience and purpose will always matter most.
Practical tips if you want to try this yourself
Before you start prompting
- Clarify the story: what is the moment or message you need this image to support?
- Define the mood: warm, hopeful, calm, energetic, serious or celebratory?
- Consider context: hero image, blog header, case study panel, donation page or service page?
These decisions will guide which images you choose as a base and which directions you push with AI. They also help keep your imagery aligned with your overall body of work, rather than becoming a collection of disconnected visuals.
While working in AI tools
- Start small – adjust little things, rather than trying to rebuild the entire scene.
- Iterate prompts gradually so you understand what each adjustment changes.
- Zoom in to check details like hands, faces and edges for subtle artefacts.
After AI generation
Once you have a strong AI-assisted version, take the time to refine it:
- Compare it side by side with the original stock image to see what was gained and what might have been lost.
- Use other tools like Adobe Photoshop to complement your AI workflow.
- Export test versions at the sizes your website actually uses to check sharpness and realism.
If you are working with an agency on your business or not-for-profit website, this is also a good moment to bring the image into conversation with the rest of your marketing strategy.
Conclusion: AI as a quiet partner in better website imagery
Our experiments with Nano Banana Pro started with a flawed stock image and a simple question: could AI help us turn this into something we would confidently put on a live website for an NFP, charity or small business client? The answer was yes – but only when we combined the tool with human judgement, clear direction and careful post-production process.
At the same time, it is important to acknowledge that some creatives and artists feel uneasy about the rise of AI. There are real questions around originality and respect for the people who created the source material we build on. In our case, we are working from licensed stock, and the Unsplash+ licensing we’ve reviewed explicitly allows modification and commercial use, which gives a level of comfort that this type of AI-assisted editing sits within the intended use.
From Unsplash licensing page:
Unsplash grants you an irrevocable, nonexclusive, worldwide copyright license to download, copy, modify, distribute, perform, and use images from Unsplash for free, including for commercial purposes, without permission from or attributing the photographer or Unsplash. This license does not include the right to compile images from Unsplash to replicate a similar or competing service.
If you are curious about how this approach could work for your organisation, it is worth exploring how AI enhanced imagery could sit alongside your existing photography efforts.
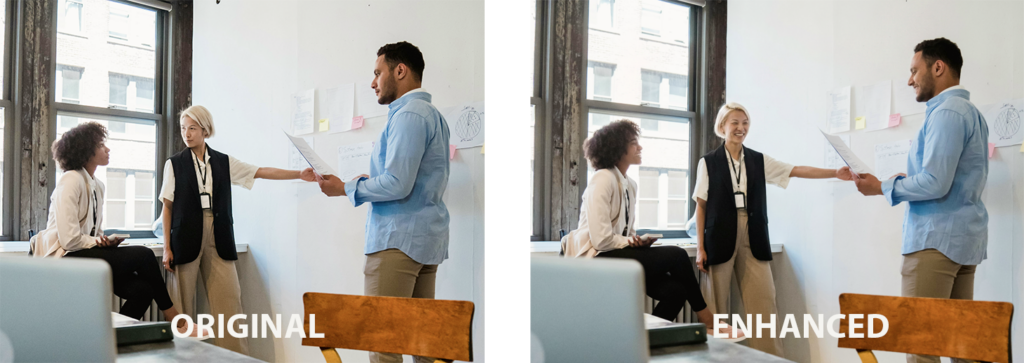
We also wanted to leave you with a few of the other ‘smile’ tests we ran, showing how small changes can completely shift the feel of an image.